iPhone Screen Repair Tips: Repairing Your Cracked iPhone Screen Step-by-Step
- Macdroid Store

- Nov 17, 2025
- 4 min read
Updated: Jan 1
We’ve all been there - that heart-stopping moment when your iPhone slips from your hand and lands face down. The screen cracks, and suddenly your trusty device feels a little less trusty. But don’t worry! Fixing a cracked iPhone screen is something you can tackle with a bit of patience and the right guidance. I’m here to walk you through the process step-by-step, making it as simple and friendly as chatting with your helpful neighbor. Ready? Let’s get started! 😊
Why Fixing Your iPhone Screen Matters
A cracked screen isn’t just an eyesore. It can affect how your phone works and even cause injury if the glass shards are sharp. Plus, a damaged screen can let dust and moisture sneak inside, potentially harming the internal parts. Fixing it quickly keeps your phone safe and working well.
If you’re wondering whether to DIY or seek professional help, here’s a quick tip: small cracks might be manageable at home, but bigger damage usually needs expert care. And if you want a fast, affordable, and reliable cracked iPhone screen fix, check out Macdroid Store for trusted service.
iPhone Screen Repair Tips: What You’ll Need
Before you dive in, gather your tools. Having everything ready makes the process smoother and safer. Here’s a simple list:
Replacement screen (make sure it’s compatible with your iPhone model)
Small Phillips screwdriver
Pentalobe screwdriver (for iPhone screws)
Plastic opening tools or guitar picks (to gently pry open the phone)
Tweezers
Suction cup (to lift the screen)
Adhesive strips (to secure the new screen)
Soft cloth (to keep your workspace clean)
Safety glasses (to protect your eyes from glass shards)
Remember, working on your phone requires patience. Take your time and don’t rush!
Step-by-Step Guide to Repairing Your Cracked iPhone Screen
Step 1: Power Off Your iPhone
Safety first! Turn off your phone completely before starting. This prevents any accidental damage or short circuits.
Step 2: Remove the Screws
Use the pentalobe screwdriver to remove the two screws near the charging port. Keep them safe - they’re tiny and easy to lose!
Step 3: Lift the Screen Gently
Place the suction cup near the bottom edge of the screen and gently pull up to create a small gap. Use a plastic opening tool or guitar pick to carefully pry around the edges. Don’t force it - the screen is delicate.
Step 4: Disconnect the Battery
Once the screen is slightly lifted, you’ll see connectors inside. Use the screwdriver to remove the metal shield covering the battery connector, then disconnect the battery cable with a plastic tool. This step is crucial to avoid electrical damage.
Step 5: Disconnect the Screen Cables
Next, remove the screws and metal shields covering the screen connectors. Carefully disconnect the cables attaching the screen to the phone’s body.
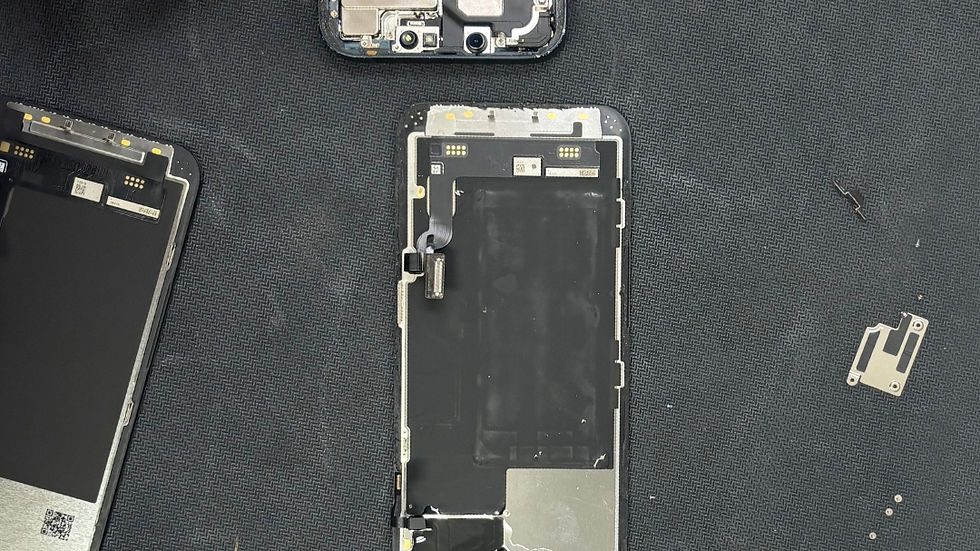
Step 6: Remove the Broken Screen
Now you can fully lift the cracked screen away from the phone. Be gentle to avoid damaging any parts.
Step 7: Transfer Components to the New Screen
Your new screen might not come with some parts like the front camera, speaker, or home button. Carefully remove these from the old screen and install them on the new one.
Step 8: Reconnect Everything
Attach the screen cables back to the phone, replace the metal shields, and reconnect the battery.
Step 9: Close Your iPhone
Gently press the screen back into place, making sure it fits snugly. Replace the two screws near the charging port.
Step 10: Power On and Test
Turn your iPhone on and test the new screen. Check the touch response, display quality, and front camera to make sure everything works perfectly.

Tips to Keep Your iPhone Screen Safe in the Future
Fixing your screen is great, but preventing cracks is even better! Here are some friendly tips to keep your iPhone looking fresh:
Use a sturdy case with raised edges to protect the screen.
Apply a tempered glass screen protector for extra defense.
Avoid placing your phone in back pockets or loose bags where it can fall.
Be mindful when using your phone near hard surfaces.
Clean your screen gently with a soft cloth to avoid scratches.
When to Call in the Experts
Sometimes, DIY isn’t the best choice. If your phone has:
Multiple cracks or shattered glass
Touchscreen issues after repair
Problems with Face ID or camera
Water damage along with the crack
It’s smart to seek professional help. Places like Macdroid Store offer quick, affordable, and reliable repairs that save you time and stress.
Your Friendly Neighbor’s Final Thoughts
Fixing a cracked iPhone screen might seem scary at first, but with the right tools and a little patience, you can do it! Remember, safety is key, and if you ever feel unsure, professionals are just a call or click away. Whether you choose to DIY or get expert help, your phone will be back to looking and working great in no time.
Thanks for stopping by! If you found this guide helpful, feel free to share it with friends who might need a hand with their cracked screens. Happy repairing! 📱✨


Comments